|
<< Click to Display Table of Contents >> Watermark Manager |
  
|
|
<< Click to Display Table of Contents >> Watermark Manager |
|
Each chapter can have a watermark associated with it. Watermarks get printed first on every page found within the chapter, which includes all of its topics and subtopics. Useful for adding personalized cover pages or borders and logos for all pages in a report as a few examples. These watermarks are added to various chapters using the ReportView Manager. The Watermark Manager manages these watermarks for previewing and easy assignment. When invoking the Watermark Manager, you are presented with the following dialog:
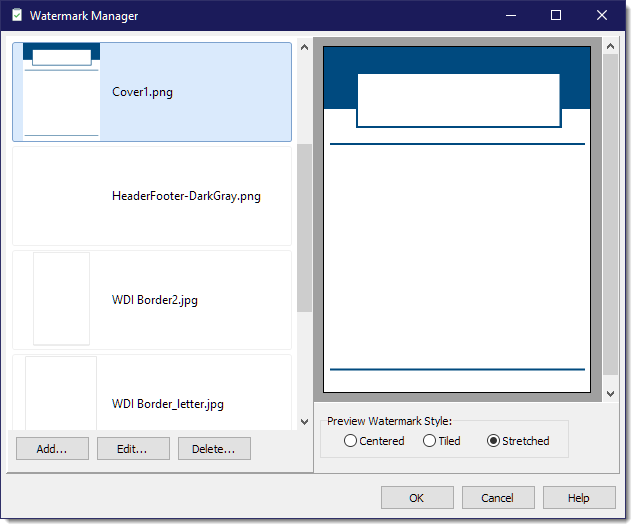
On the left side is a thumbnail view of each watermark in the database, and on the right side is a sample preview of how it would appear on the page, depending on if you selected to center, tile or stretch the watermark.
You can add additional watermarks by clicking the [Add...] button. Additional watermarks may be provided during updates and can be found in the Samples\Watermarks folder under the installation directory path (depending on whether you installed the 64bit or 32bit version of WhisperReporter Ascent). Examples:
•64bit: C:\Program Files\Whisper Computer Solutions, Inc\WhisperReporterV2\Samples\Watermarks
•32bit: C:\Program Files (x86)\Whisper Computer Solutions, Inc\WhisperReporterV2\Samples\Watermarks
You can also edit a Watermark using the built in Image Editor by clicking the [Edit...] button. This can be especially useful to add tags to a watermark if the Watermark is being used as an overlay (printed last on the page) rather than as a standard watermark (printed first on a page). If printed as an overlay, any text not in a transparent area of the page will be masked out. If you want certain data like a property address and client name printed on part of the overlay that is not transparent, you will need to add the tags using the image editor rather than typical topic comment tags which should be used for standard watermarks. These tags can be added using the Text insertion option in the image editor and will only be resolved if the watermark is printed as an overlay.
To remove a watermark from the database, click the [Delete...] button which will prompt for confirmation or to let you know it is in use and cannot be deleted.
Watermarks can be overridden when generating the report in case you wanted to temporarily add a "Draft" watermark for example. This would be done in the Report Generation dialog.
See also: