|
<< Click to Display Table of Contents >> ReportView Manager |
  
|
|
<< Click to Display Table of Contents >> ReportView Manager |
|
The Report View Manager is the starting point for all modifications to a template’s design, structure and default content. Starting from the Report View Manager you can easily access the managers for Chapter Layouts, Topic Layouts, Hints and RapidRemark Views.
The main purpose of the Report View Manager is to facilitate adding, removing or editing report navigation items which are linked to a report’s Table of Contents and to apply custom views and layouts that control the look and feel of report topics.
A view can generally be thought of as a box or container for needed components. A layout is a blueprint for a component of a report. It controls how that component will look to the report creator and client.
WARNING: These are advanced “behind-the-curtain” management tools. If done incorrectly changes that you make can affect all past reports of the same type, which is not usually the goal. It is very important to create a copy view or layout and work from that. This will be further explained at the appropriate time in this, and all, advanced guides. This step is extremely important.
To access the Report View Manager, either right click the Report View navigation pane of an open report, or use the following menu sequence Report Designer > Report View Manager.
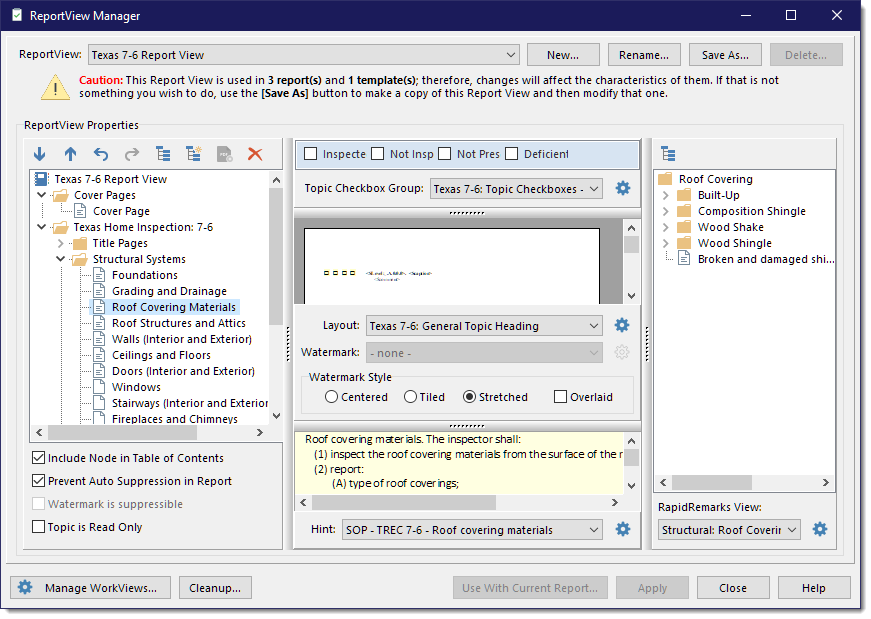
ReportView – Every report view has a unique name. Use this drop-down to select the view you would like to work on.
ReportView Buttons – These buttons: {New] [Rename] [Save As] and [Delete] allow you to start a new view, rename the current view, copy the current view and delete the current view, respectively. To delete a view, it must first not be associated with any reports or templates and all of its chapters and topics must be deleted.
ReportView Usage Statistics – The line just below the selected Report View will tell you how many reports and templates in the current database use this report view. It will be emphasized to bring attention to you that changes will affect existing reports which may or may not be what you wanted to do. If it is not what you want to do, you might want to click the [Save As] button and work on the new copy of the Report View.
Manage WorkViews - This button in the lower left will invoke the WorkView Manager, defaulting to the WorkView associated to this ReportView, if any.
Cleanup - This button in the lower left will only appear if there are orphaned Topic Comments that were previously associated with this ReportView. This would occur if you have a report or template that uses this ReportView and you subsequently deleted one or more of the topics in the ReportView. WhisperReporter Ascent orphans those topic comments in case you accidentally deleted a topic and then add it back in later. If the topic is added back in, then any reports or templates using this ReportView and had topic comments for that topic will be reinstated without loss of report data. However, you may have deleted that topic on purpose and any existing topic comments for that topic are no longer needed. You can use this [Cleanup] button to delete those orphaned topic comments.
ReportView Properties
Report Navigation / TOC – In this panel on the left side, the report's navigation and table of contents is maintained. Single-click on any of the topics or chapters to view or modify the layouts and views associated with them.
Topic Checkboxes - This panel above the center Layout Preview panel manages the topic checkboxes used by a selected topic. Use the drop down to assign a different checkbox group or click the Gear button to edit or create new checkbox groups.
Layout Preview – This center window will show you a minimized version of the selected chapter or topic layout. Use the scroll bar to see the layout from top to bottom. Use the Layout dropdown to assign a different layout to the selected topic or chapter or click the gear button to edit or create a new layout.
Watermark - WhisperReporter Ascent allows you to add a watermarks for one or more chapters which will be applied to each page/topic printed under that chapter. To add a watermark, select the chapter you want to apply a watermark to. Select the desired watermark from the list of available watermarks or click the gear button to the right of the watermark dropdown which opens the Watermark Manager in which you can add and manage the available watermarks. Once you have loaded and selected the image you then have the option to either center, tile or stretch the image on the page. By default, Watermarks are images that will be printed onto the page before any other page printing is performed, basically placing the watermark onto the background. However, you can declare the Watermark to be Overlaid onto the page which will cause the Watermark graphic to be printed on the page after everything else has been printed, basically placing the watermark in the foreground. Typically, a traditional Watermark is used to add borders to all pages and/or add a special background to the cover page, whereas an overlay is used to frame the page so that only certain parts of the page comes through, such as to frame a rectangular image by a rounded frame using a PNG file containing a transparent section. Note: PNG images used for watermarks are only supported when generating a PDF report.
Topic Hint Preview – This yellow window below the center Layout preview window will show you the hints that are applied to a particular topic, if there are any at all. If there are more hints than the window will show, use the scroll bar to view the rest of the hints. You can also use the slider above that panel to increase or decrease the panel size to view more of the hint. Use the dropdown to assign a different hint to the selected topic or click the gear button to edit or create new hints.
Topic RapidRemarks Preview – The right panel will show you which RapidRemarks are available to a topic. These are the RapidRemarks you will see available when creating the report. There may also be none. Use the RapidRemark View dropdown to assign a different RapidRemark View or click the gear button to edit or create a new RapidRemark View.
See also:
Modifying the Report Navigation / TOC