|
<< Click to Display Table of Contents >> Printing |
  
|
|
<< Click to Display Table of Contents >> Printing |
|
WhisperReporter offers several options for printing your report, the most common are printing to a PDF and printing to a hard copy. Access the print dialog two ways:
1.Go to File > Print/Generate Report.
2.Click the printer icon in the upper-left corner of the screen.
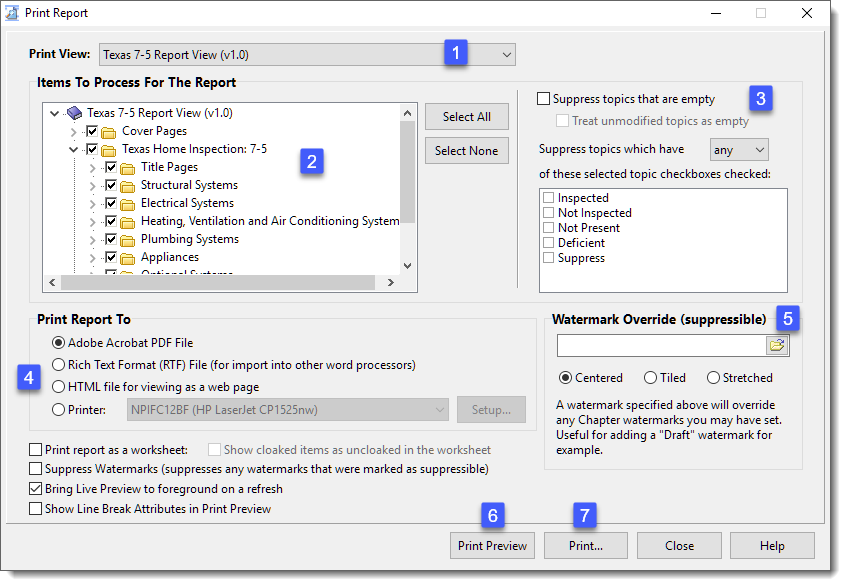
(1) Print View - Choose between the Report View or the Work View (if available) as the layout to use for the print output.
(2) Items To Process For The Report – This section allows you to specify which chapters or topics not to print by unchecking them either at the chapter level or topic level. To uncheck at the topic level, click on the gray pointer next to a chapter to expand it.
(3) The Topic Suppressor – These two check boxes allow you to automatically suppress (not print) any topics in the report that are empty. Empty topics are blank and have no content. You also have the option to treat topics you did not edit as empty, suppressing them as well. These options work well, but it may take a couple of “Print Previews” to know what combination of these boxes you need to use. If all else fails, leave these boxes unchecked and suppress using (2).
(4) Report Format – These options let you decide in what format to print your report, whereas PDF and hard copy are the most common. Rich Text (RTF) can be opened by Word, but there are some issues with formatting, especially tables and headers/footers, where only the "all pages" header/footer would be used. Also, horizontal line will not transfer, but you can use paragraph top/bottom border to give you a horizontal line instead. If you want to use HTML, be sure your Layouts all conform to a style that converts the native editor format into the resulting HTML that is satisfactory to you (headers and footers will be ignored when printing to HTML format).
(5) Watermark – WhisperReporter allows you to add a watermark to your report. First you need to create or download an image you want to use. Save the image to a folder you can find. Click the folder icon, below (5) shown above, and navigate to the image. Once you load the image you then have the option to either center, tile or stretch the image on the page.
(6) Print Preview – Before printing, you have the option to see your report in print preview. Use this to check headers and footers, pagination, and the appropriate suppression of topics. The print preview button may also display the “Audit Alert” report. This Report Audit tells you if and where there are unselected picklists and placeholders that have not been deleted or changed. It is important to clear these alerts because place holders will print as “XXXX” on the printed report and picklists will print with their name.
(7) Print – Once you are satisfied with your report and have selected the format you want; you can print official copies using the “Print…” button. Again you may get the Report Audit alert for a final check.
Other options:
•Print report as a worksheet
Print the report as is, however, no topic checkboxes will be selected, and any client data is not included. You can also optionally show cloaked items as uncloaked so that they will appear in the worksheet.
•Suppress Watermarks
Suppresses any chapter watermarks that were marked as suppressible.
•Bring Live Preview to foreground on a refresh
Whenever changes are saved, the Print Preview windows is updated. Select this option if you want the Print Preview window to come to the forefront.
•Show Line Break Attributes in Print Preview
Select this option to be able to see where the line breaks are in the report. This can be useful when previewing and adjusting page breaks and spacing between topics / chapters.
See also: