|
<< Click to Display Table of Contents >> Picklist Manager |
  
|
|
<< Click to Display Table of Contents >> Picklist Manager |
|
The Picklist Manager is used to add, remove or edit picklist items. There are several ways to access the Picklist Manager:
•From the menu bar choose Tools > Picklist Manager.
•Click the Picklist button on the toolbar and choose the first option “Picklist Manager…”
•Click any picklist (as if you were filling it in) and select the first option “Picklist Manager…”
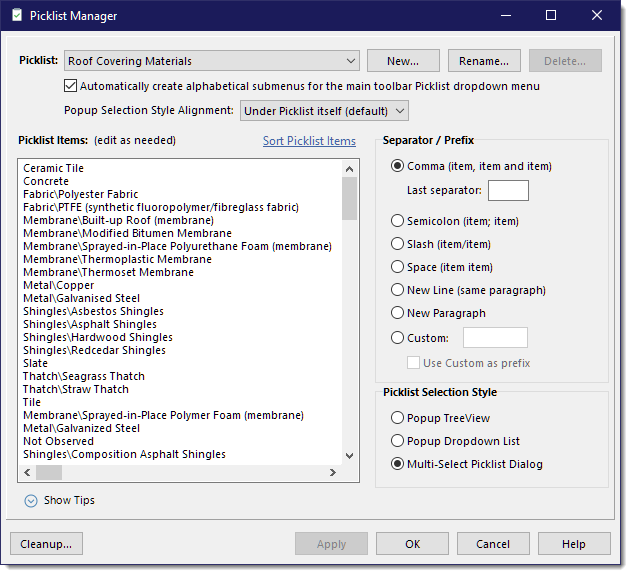
The Picklist Manager window provides a lot of options for managing picklists.
•Picklist - The picklist drop-down lists all of the picklists that are available in the system. Remember, that the name or title of the picklist corresponds to the word(s) being double-underlined in the report when no option for the picklist has been chosen.
•[New...] [Rename...] and [Delete...] buttons to manage the available picklists.
•Automatically create alphabetical submenus... - This checkbox is used to organize the list of picklists seen when you push the picklist button on the editor toolbar. When unchecked, the list of available picklists will show alphabetically and will need to be scrolled through. When checked all of the picklists are grouped by the first letter of their name.
•Popup Selection Style Alignment - Select where you want the pop-up to show up. Aligning it in the upper corners can be useful when the picklist contains a lot of items.
•Picklist Items - This is the text entry area is where we edit the picklist items. Enter each unique entry on a new line. You can edit or remove existing items as well. Various options can be used when defining the Picklist Items. Expand the "Show Tips" link below the list to get help on these options as described in Advanced Picklist Customization. You can also click the "Sort Picklist Items" link button to sort the items alphabetically. Push it again, and you can sort in the reverse order.
•Separator / Prefix - With multi-select picklists you can define the character or word that will separate the choices. You can also specify an ending separator to produce results like: "one, two and three".
•Picklist Selection Style - Allows you to select how you would like the picklist to show itself. Each picklist can be set to show differently depending on the best use for that specific picklist.
Popup TreeView - Typical popup menu, useful for simple selection with only a few items to choose from.
Popup Dropdown List - Presents a dropdown combobox where you can type a few characters to quickly select a single picklist item.
Multi-Select Picklist Dialog - Invokes a dialog with all the picklist items in which you can chose multiple picklist items in any order.
Additional instructions for advanced customization which is described in detail in the next section, Advanced Picklist Customization.
You also have the ability to remove any picklists not currently being used in any report, template or RapidRemark. To use this feature, click the [Cleanup...] button. When clicked, it will start a scan of all your reports, templates and RapidRemarks looking for picklists. It will then present the following dialog from which you can selectively choose those unused picklists you would like to delete:
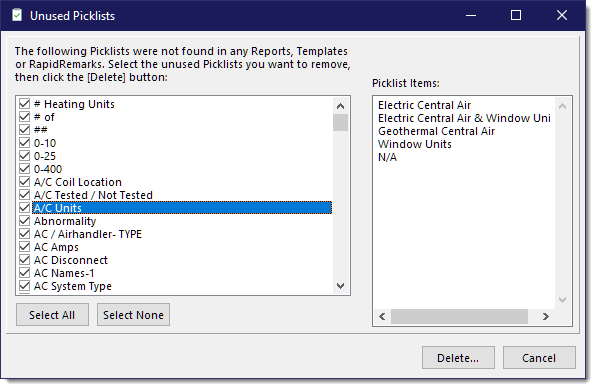
By default, all unused picklists will be marked for deletion. To examine what items a picklist contains, select one of the picklists on the left and its set of items will appear on the right. Once you have marked those picklists you no longer need by checking or unchecking the respective checkboxes to the left of each pickist, click the [Delete...] button which will first prompt you to be sure you want to continue with the deletion.
See also:
Advanced Picklist Customization
Adding a Picklist to a Template