|
<< Click to Display Table of Contents >> Configuring the photo camera |
  
|
|
<< Click to Display Table of Contents >> Configuring the photo camera |
|
In order to use the Camera, you must configure it before the Photo Camera icon ![]() will be available in the editor toolbar. To invoke the Photo Camera Setup, use the Setup > Photo Camera... menu sequence which invokes the following dialog:
will be available in the editor toolbar. To invoke the Photo Camera Setup, use the Setup > Photo Camera... menu sequence which invokes the following dialog:
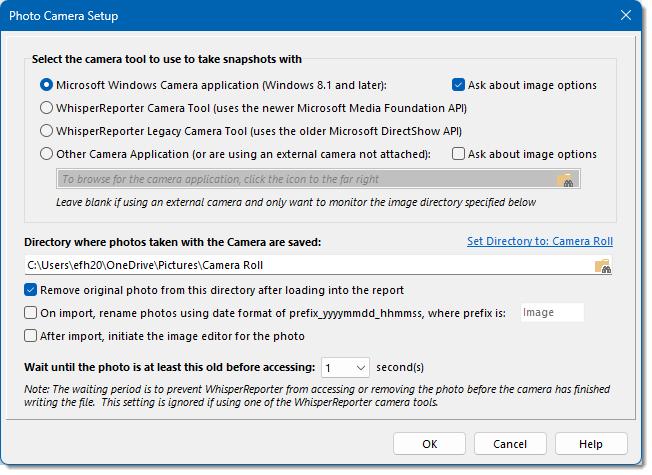
You have four camera tool options:
•Microsoft Windows Camera Application
This uses the built-in Camera application provided by Windows. In many cases, this provides the best quality. Optionally, you can have WhisperReporter Ascent ask you as to whether you want to apply the image options such as shadow etc, as configured in Setup > Preferences > Images, or not.
•WhisperReporter Media Foundation based Camera Tool
This uses the newer Microsoft Media Foundations API to capture images. However, many camera manufactures want you to use their camera application, and as such either doesn't always provide all the supported resolutions through this API, but should be sufficient. This camera tool has an option within its dialog as to whether you want to apply the image options as configured in Setup > Preferences > Images or not.
•WhisperReporter DirectShow based Camera Tool
This uses the older but widely supported Microsoft DirectShow API to capture images. However, many camera manufactures want you to use their camera application, and as such don't always provide all the supported resolutions through this API, or they use an old driver not fully compatible with the camera in use due to Microsoft's recommendation to use Media Foundation. If you find some issues using this tool, try the Media Foundation tool mentioned above. This camera tool has an option within its dialog as to whether you want to apply the image options as configured in Setup > Preferences > Images or not.
•Other Camera Application
Choose this option if you want to take advantage of the camera manufacturer's own camera utility. This will provide all the features of the camera whereas the other choices might not. You can also leave this entry blank to simply provide for directory monitoring as described below, such as when using an external unattached camera that sends images over WiFi or Bluetooth to your PC. Optionally, you can have WhisperReporter Ascent ask you as to whether you want to apply the image options, such as shadow etc, as configured in Setup > Preferences > Images, or not.
You also will need to specify a directory folder where the images taken by the selected camera application are saved. This does not necessarily configure the camera application, it simply tells WhisperReporter Ascent where those images can be found as saved by that application. The Microsoft Windows Camera application saves images into the Camera Roll folder in your Pictures so it is recommended to use that folder. Simply click the link "Set Directory to: Camera Roll" to auto fill the directory path if it is not already set to that by default. For each of the WhisperReporter Ascent Camera tools, it will use that directory specified; however, for any other camera application, you may need to either configure it to use the specified directory folder or you will have to modify this WhisperReporter Ascent directory setting to the actual directory used by that application.
Note: If you are using some other means to capture images other than a camera tool or an external camera that transfers their images over WiFi onto your computer, choose "Other Camera Application" and leave it blank. WhisperReporter Ascent will still monitor the directory folder specified for new images. One example of this is using your phone to take a photo that gets uploaded to DropBox. If your PC is also connected to DropBox, you could have WhisperReporter Ascent monitor the DropBox folder that uploaded images are sync'd to. When DropBox syncs, your image will be inserted into WhisperReporter Ascent provided the folder is being monitored, as explained in the Using the photo camera section. Some cameras can automatically transfer new photos over WiFi or Bluetooth into a folder on your PC. This same technique applies to those cameras as well.
Remove original image from this directory after loading into the report
You can have WhisperReporter Ascent delete the source image after it has been brought into WhisperReporter Ascent. We don't usually recommended doing this because you might need to access the original image at a later date as images brought into WhisperReporter Ascent are usually scaled down to conserve space in the generated report.
On Import, rename photos using date format of prefix_yyyymmdd_hhmmss
If the inspection is being carried out by multiple inspectors and you will be merging the individual inspector reports together into a final report, each inspector may be using a camera tool that names their pictures using a standard naming convention which could lead to a situation where two different inspection photos have the same name causing one to overwrite the other when merging. To avoid this, you can have WhisperReporter Ascent automatically rename the images when imported into WhisperReporter Ascent. One suggestion is to set the prefix for each inspector using their initials. Not only with this provide a unique file naming convention, it will also provide an indication as to which inspector took the photo.
After import, initiate the image editor for the photo(s)
If you like to edit your photos as you take them, you can select this option. When new photos show up in the monitored folder, WhisperReporter Ascent will open the image editor for each new photo after it has been loaded into the database.
Wait until the image is at least this old before accessing
Depending on the resolution of the image being taken, WhisperReporter Ascent could at times attempt to grab the photo before the camera has finished writing the file. To help alleviate this contention, you should set a wait time to at least one second or more, dependent on the speed of the photo transfer by the camera. This setting is ignored if using one of the WhisperReporter Ascent's camera tools because those camera tools use a temporary file name extension until the file is fully written to disk and then renamed appropriately, so no wait time is needed.
See Also: