|
<< Click to Display Table of Contents >> Images |
  
|
|
<< Click to Display Table of Contents >> Images |
|
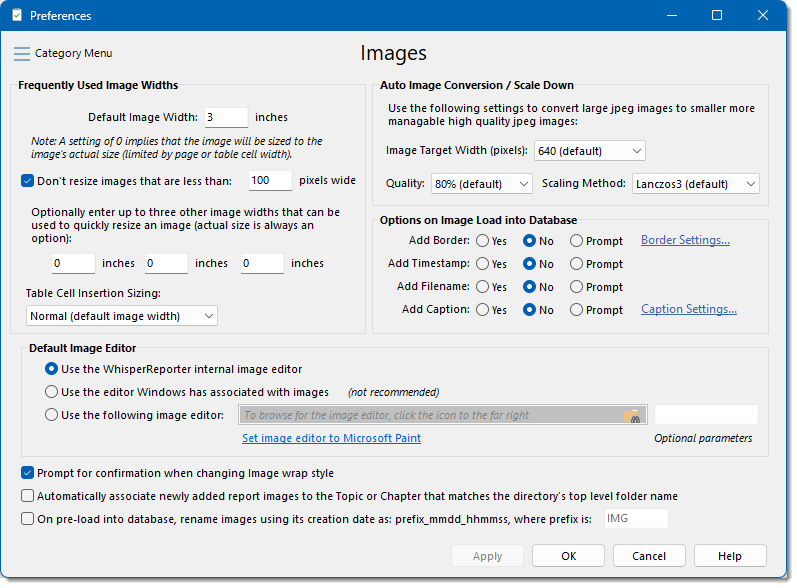
Frequently Used Image Widths
WhisperReporter Ascent saves you from having to resize photos whenever they are inserted into a report by allowing you to set default and frequently used widths. This means that all images will automatically be a consistent width when inserted into a report and consistent resizing can be made with the click of the button. The first setting, “Initial Image Width” is the default width images will be when inserted into a report. The other three settings will be available widths for an image once it has been inserted into the report. To change the image width to one of these alternate widths, right-click the image and hover over “Set Image Width To”. You will see the alternate widths as well as the original default width and the option to set it to the actual image width. Clicking on one of these options will automatically resize the photo. The image size can be manually changed at any time by clicking on the image to show the image "grips" and then dragging one or more of the grips. To resize and maintain aspect ratio, you would drag any of the corner grips.
Image sizing can be avoided for small images, like glyphs that you want to add to emphasize certain comments. You can select the option "Don't resize images that are less than x pixels wide" to allow for this (default is 100 pixels wide). Not only does the image load into the database as-is with no scaling or display sizing applied when added to a comment, it will also not apply any options like borders, captions, etc. when loaded into the database.
Table Cell Insertion Sizing
•Normal - This option will treat the image insertion the same as if it was not being inserted into a table cell and will use the "Default Image Width" setting.
•Scale to fit width - Use this option to automatically scale the image to fit the table cell's width. Smaller images will be scaled up to fit the width of the table cell and large images will be scaled down to fit the width of the table cell. Be aware that if your image is very small, it might appear pixelated if the table cell is significantly wider than the actual image width. Note also the the table row height could expand to maintain the image aspect ratio; if that is not desired, use the "Scale to fit" option described below.
•Use actual image size - Use this option to only have an image scale down to fit the table cell if the actual size is larger than the table cell. Smaller images will not be scaled up to fit.
•Scale to fit - Use this option to automatically scale the image to best fit the table cell's height and width without expanding either the width or height of the table cell. It will attempt to size the image until either the image reaches the height or width of the table cell. Smaller images will be scaled up to best fit the table cell and large images will be scaled down to best fit table cell. Be aware that if your image is very small, it might appear pixelated if the table cell is significantly larger than the actual image.
Auto Image Conversion/Scale-down
When JPEG images are imported into WhisperReporter Ascent they can be automatically converted from their raw size and type to a smaller, more manageable, database and PDF friendly, high resolution JPEG. The system uses these three preferences to guide the conversion. The default settings are optimized for WhisperReporter Ascent and are not recommended that they be altered under normal circumstances. Image types other than JPEG (.jpg) are not scaled.
Options on Image Load into Database
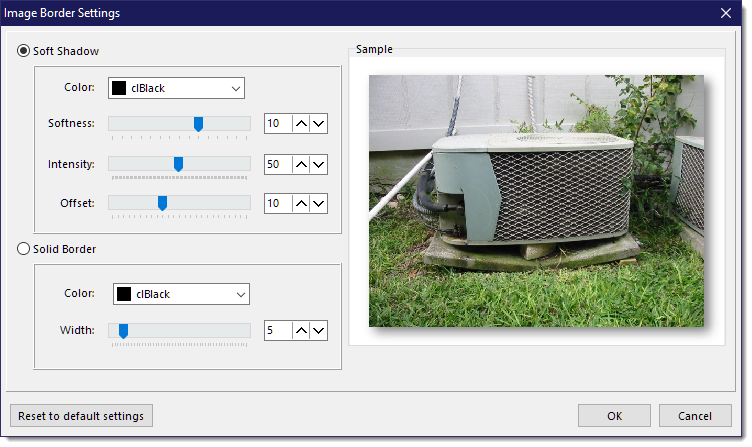
•Add Border
These border preferences determine whether images are imported into WhisperReporter Ascent with a border (click on the Border Settings link to select shadow or solid border and its properties, see below). The default preference is “No”, which will not add any border to the image. If you set this to “Yes”, then every photo will be imported with a border. If you set this to “Prompt”, you will be asked each time an image is loaded into the database as to whether or not to add a border.
Border Settings
Clicking on Border Settings opens a separate dialog where you can adjust the border properties. Use the slider bars and color drop-downs to make your changes. The Sample image on the right will display the result of your changes. Click [OK] to save you changes and return to the preferences window. Click [Cancel] to return without saving. The image shown below is showing the default settings which can be restored by clicking the [Reset to Default Settings] button.
•Add Timestamp
When images are imported into WhisperReporter Ascent and the image itself contains embedded EXIF date/time information, you can choose whether or not to have the timestamp information added as a footer to the image. The default preference is “No”, which will not add the timestamp to the image. If you set this to “Yes”, then every photo that has the EXIF timestamp information will be imported with the timestamp added to bottom right of the image. If you set this to “Prompt”, you will be asked each time an image is loaded into the database as to whether or not to add the timestamp footer (but only if it contains this EXIF timestamp data).
•Add Filename
When images are imported into WhisperReporter Ascent, you can choose whether or not to have the filename added as a footer to the image. The default preference is "No", which will not add the filename to the image. If you set this to “Yes”, then every image will be imported with the filename added to the bottom left of the image. If you set this to “Prompt”, you will be asked each time an image is loaded into the database as to whether or not to add the filename as a footer.
•Add Caption
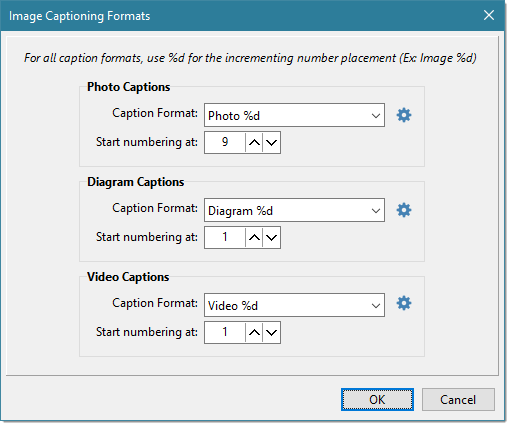
When images are imported into WhisperReporter Ascent, you can have a caption added to each image. The default preference is "No" which will not add captions to images when imported, but can still be added later using Add/Update image Caption menu option when right clicking a selected image or when right clicking a comment area or a navigation node and selecting Update Image Captions. The font used is configured in Setup > Preferences > Fonts > Default Font for Image Captions. For more information, see the section on Captioning Images.
Caption Settings
Clicking on Caption Settings opens a separate dialog where you can setup the default caption format and positioning for each type of import: Photos, Diagrams and Videos, as well as manually added captions. The caption format you enter should include a %d where you want the number to appear. If you have a current report open, the starting numbers will show what the next number that will be used for each respective image type being imported. As below for example, the next photo to be imported will be assigned a caption of "Photo 11".
Default Image Editor
Once images have been imported into the system you can make changes to the photo like add text or arrows. The changes will be made to the copy in the database so the original photo will be preserved. The editor, set by one of the following three options, is accessed by double-clicking on an inserted image or by selecting one or more images in the image panels and right clicking to select Edit Selected Image(s).
•Use the WhisperReporter Ascent internal image editor - Sets the photo editor that comes with WhisperReporter Ascent as the default.
•Use the editor Windows has associated with images - Sets the default editor to be the same editor that your PC uses by default. This may be MS Paint, Windows Photo Manager, or software that came with your digital camera.
•Use the following image editor - To use software such as Photoshop or other software that may not the Windows default, select this option. You can also include any optional parameters the software might require.
If you do not have any image editing software besides Paint installed on your PC, it is recommended that you use the WhisperReporter Ascent photo editor. You can quickly set the path to Windows Paint without having to hunt for it by clicking the "Set image editor to Microsoft Paint" link button just below the image editor path.
Other options
•After import, initiate the image editor for the image(s)
If you would like to edit your images right after you have loaded them into WhisperReporter Ascent, you can select this option. When new images have finished being loaded into the database, WhisperReporter Ascent will open the image editor for each new or replaced image.
•When selecting a comment image, track it in the image panels
With this option enabled, the "Used Images" and "All Images" panels will position itself to the selected image.
•Prompt for confirmation when changing image wrap style
To prevent an accidental switch from how an image is positioned and/or its text wrap style, you can have WhisperReporter Ascent prompt for confirmation before the change takes effect. This is useful because WhisperReporter Ascent will apply the same positioning/wrap style to other images being inserted going forward, which might not be what you expected.
•Automatically associate newly added report images to the Topic or Chapter that matches the directory's top level folder name
To help prevent image clutter, you can associate images to be specific to certain topics or chapters, so that you only see photos for roof covering when you are editing the Roof Covering topic, or all electrical related image in the Electrical System chapter as some examples. By default, this is not checked so that all images are basically global to all chapters and topics. You can select images in the image panels to associate them at any time, however you can also have this association performed automatically based on what folder the image originated from. If you have this option enabled and you loaded images that were in a folder called "Electrical Systems", then those images would only appear when you are in any topic that is part of the Electrical Systems chapter.
•On pre-load into database, rename images using its creation date as: prefix_mmdd_hhmm, where prefix is xxxx
When using the Pre-Load Additional Images/Diagram tool, you can have it automatically rename the images to using the image file's creation date. This allows for a consistent naming convention and will allow the image panels to sort based on the image file creation date. You can use the Prefix entry to identify the inspector that took the picture, for example. This only applies when using the pre-loading of images tool so that you can still load an image by its actual name by adding a new image to a topic comment using the editor toolbar button to insert a photo or diagram. In that case, the image name will be its original name.
See also: